Saturday, May 30, 2009
How to forge an IT Consulting Career (bookmark)
Found this article to be relevant this blog and thought I would bookmark it here.
Tuesday, May 26, 2009
Programmer's Journal - Chapter 3
Chapter 3 – Anatomy of a program
This chapter will introduce some of the basic anatomy of the program.
Namespace
Every DotNet program is called an assembly (irrespective if it is a WinForm application, Console Application or even a .DLL library). All DotNet codes are arranged in Namespaces. Even if your code does not declare a namespace, it is automatically placed into a default namespace. Namespace provides a way for you to declare classes and modules and without needing to make sure that the name has not been previously used (unless it will be in the same namespace). For example, you have buttons in Web Forms (System.Web.UI.WebControls.Button) ; you have also buttons in Windows Forms (System.Windows.Forms.Button). Without namespaces, this would not be possible.
In our examples of “Hello World”, we use System.Console.WriteLine to write the “Hello World” at the console.
It would be tedious to do that for every single code. Alternatively, the namespace can be imported, as shown below. However, if two classes (from different namespace) with the same name are used and both namespaces were imported, the fully qualified name must be used to avoid confusion. (Just as you would if you have two John in the room, you need a way to tell which John you are referring to).
Modules and Classes
Module is a special type of class that cannot be instantiated – meaning all references to the members in the module refers to the same instance. All members (subroutine, variables, functions etc) of a module are implicitly shared. Also, you cannot inherit a module nor can you derive a class from a module. Therefore, if you have a change the value of a variable in the module, all codes that refer to the variable will see the same value. This is very important to remember especially if you are going to write in ASP.NET or any multiuser application. When more than one person access it, you will encounter strange results and error.
One way to overcome this is to pass the values as parameters to your functions and subroutines (as you would in shared subroutines and functions).
For classes, you can have multiple instances of a class. Variables within each instance are independent of other instances. As shown in the example below:
The output is as follows:
The following lines of code will produce the same output:
Setting and getting values of Variables within Classes
If you have some variables in a class, which you want to be able to obtain values as well as change the values. There are a few ways of doing it:
1. Declare the variable as public.
2. Have a Subroutine to set the value and have a function to return the value.
3. Create a property for setting and getting the value.
Option 1 is the easiest method but there are several problems with it. You have no control on how the values are set and neither do any classes that inherit from this class.
Option 2 and 3 provides much better flexibility. You can:
1. Add additional logic to control values you can set for the variable.
2. Allow the derived class to change the logic.
3. Make the variable read only from the outside by not declaring the subroutine for setting the value or the property for setting the value (while still allow the value to be changed during initializing, or by other subroutines or functions within the class).
The following is a sample of the above:
The output is as follows:
In Sub Var3 and Property Var4, if the value passed is more than 50, set the value to –1.
Constants
Constants can (declared at the top of the program and) be used to provide a fixed value that can be used in various parts of the program. This will ease maintenance by allowing single point of modification when the value changes. It can also be used to make the code more readable by replacing numeric code with a readable name for example example vbNewLine to represent a CrLf, ConnectionState.Open is easier to understand than the numeric code it represents.
Classes Inheritance and Overriding
VB.Net is an Object Oriented Programming Language. As such, it supports inheritance.
A subroutine or function can be overwritten only if it has the keyword Overridable – the new class can then declare the new subroutine and function (with the same name) using the keyword Overrides.
Constants must be declared as Friends before it can be visible to the derived class. If the derived class wishes to overrides the value of the constant, then the new constant needs to be declared as Shadows.
The following is an example:
In cls2ndGen class, even though the value of constVal was changed to “preFixStr”, the constVal still displays the original value. This is because we are using the constVal inherited from clsOr (the original class). When writing Windows Form, Web Services and ASP.Net applications; inheriting the appropriate classes will make programming much easier.
Inheriting a class provides the option to override existing methods (subroutine or functions) or using the original implementation. That is the true power of inheritance – allowing building on the existing code (instead of starting from scratch).
Main Subroutine
When writing a console program, one shared subroutine called main is necessary. Adding the (args() as String) parameter will allow the program to accept runtime parameters.
The output is as follows:
When writing a Windows Form, a main subroutine is optional. However, a Windows Form application must:
1. Inherit from a System.Windows.Forms (or another derived class). So you cannot use a module to create program.
2. Import System.Drawing (since we will be using a lot of graphics – which we did not need when we wrote a text based (console) application.
3. Perform a System.Windows.Forms.Application.Run the form object.
The following sample will create a blank window:
The output is as follows:

For the windows form, the shared main subroutine is optional. If you leave out the shared main subroutine is not available, the main class must be specified using /main: when compiling the exe.
The modified code is as follows (the output is identical with the code above) – I added the namespace to illustrate that the class needs to be a fully qualified class, if no namespace is there then you specify /main:wForm.
The compile the above program, we need to type the following (all in one line):
The following is how the process looks like:
Events
In Window Form and ASP.Net application, majority of the work is done through event handling. Most of the controls have built in events (e.g. Buttons have Click, Form contains load etc).
There are two ways of handling events:
1. Create a subroutine and specify that it “handles the event”.
2. Adding the handler to the event
In the samples below, you will notice that all subroutines handling the events have to be declared with an object and also an eventargs as parameters. This is because the event will pass both these parameters to the event handler subroutine.
Note that you can have more than one subroutine handle a specific event and a subroutine handle multiple events.
Direct event handling
In this approach, just add the keyword “WithEvents” to the object declaration as in:
Then declare the subroutine as handling the event as follows:
Adding the handler to the event
In this approach, the “WithEvents” keyword is optional in the object declaration:
Add the handler to the event using AddressOf creates a procedure delegate instance that references the specific procedure. It is a pointer associated to the procedure:
Once done, it is not necessary to specify the event in the subroutine declaration, as shown below:
The following code illustrates the above concept. There are three buttons – two buttons are declared with “WithEvents” keyword. btnSubmit and btnSubmit3 have two handlers. Subroutine MultiHandler handles two events. The sender can be converted to the original control using CType Function, (otherwise gettype will return the type). In this case, we know that the sender is a button control, so it can be converted back to its original control in order to obtain the name of the sender.
This chapter will introduce some of the basic anatomy of the program.
Namespace
Every DotNet program is called an assembly (irrespective if it is a WinForm application, Console Application or even a .DLL library). All DotNet codes are arranged in Namespaces. Even if your code does not declare a namespace, it is automatically placed into a default namespace. Namespace provides a way for you to declare classes and modules and without needing to make sure that the name has not been previously used (unless it will be in the same namespace). For example, you have buttons in Web Forms (System.Web.UI.WebControls.Button) ; you have also buttons in Windows Forms (System.Windows.Forms.Button). Without namespaces, this would not be possible.
In our examples of “Hello World”, we use System.Console.WriteLine to write the “Hello World” at the console.
Module Hello
Sub Main
System.Console.writeline("Hello World")
End Sub
End Module
It would be tedious to do that for every single code. Alternatively, the namespace can be imported, as shown below. However, if two classes (from different namespace) with the same name are used and both namespaces were imported, the fully qualified name must be used to avoid confusion. (Just as you would if you have two John in the room, you need a way to tell which John you are referring to).
Imports System

Module Hello
Sub Main
Console.writeline("Hello World")
End Sub
End Module
Modules and Classes
Module is a special type of class that cannot be instantiated – meaning all references to the members in the module refers to the same instance. All members (subroutine, variables, functions etc) of a module are implicitly shared. Also, you cannot inherit a module nor can you derive a class from a module. Therefore, if you have a change the value of a variable in the module, all codes that refer to the variable will see the same value. This is very important to remember especially if you are going to write in ASP.NET or any multiuser application. When more than one person access it, you will encounter strange results and error.
One way to overcome this is to pass the values as parameters to your functions and subroutines (as you would in shared subroutines and functions).
For classes, you can have multiple instances of a class. Variables within each instance are independent of other instances. As shown in the example below:
'
' Module and Class Sample
' User: Strovek
' Date: 8/28/2005
'
' ========================================
Imports System
Namespace PJ
Module Mod1
Dim vNumVar1 As Integer = 10
Public Property pIntVal As Integer
Get
Return vNumVar1
End Get
Set (Value As Integer)
vNumVar1 = Value
End Set
End Property
End Module
Module Mod2
Sub Main
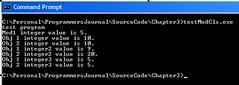
Console.WriteLine("test program")
pIntVal = 5
Console.WriteLine("Mod1 integer value is {0}.", pIntVal)
Dim ObjC1 As New cls1
Dim ObjC2 As New cls1
Console.WriteLine("Obj 1 integer value is {0}.", ObjC1.pIntVal2)
Console.WriteLine("Obj 2 integer value is {0}.", ObjC2.pIntVal2)
ObjC1.pIntVal2 = 9
ObjC2.pIntVal2 = 20
Console.WriteLine("Obj 1 integer2 value is {0}.", ObjC1.pIntVal2)
Console.WriteLine("Obj 2 integer2 value is {0}.", ObjC2.pIntVal2)
Console.WriteLine("Obj 1 integer3 value is {0}.", ObjC1.pIntVal3)
Console.WriteLine("Obj 2 integer3 value is {0}.", ObjC2.pIntVal3)
End Sub
End Module
Public Class cls1
Dim vNumVar1 As Integer = 10
Public Sub New()
End Sub
Public Property pIntVal2 As Integer
Get
Return vNumVar1
End Get
Set (Value As Integer)
vNumVar1 = Value
End Set
End Property
Public Function pIntVal3 As Integer
return pIntVal
End Function
End Class
End Namespace
The output is as follows:
The following lines of code will produce the same output:
Console.WriteLine("Obj 1 integer value is {0}.", ObjC1.pIntVal2)
Console.WriteLine("Obj 1 integer value is " & ObjC1.pIntVal2 & ".")
exit
Setting and getting values of Variables within Classes
If you have some variables in a class, which you want to be able to obtain values as well as change the values. There are a few ways of doing it:
1. Declare the variable as public.
2. Have a Subroutine to set the value and have a function to return the value.
3. Create a property for setting and getting the value.
Option 1 is the easiest method but there are several problems with it. You have no control on how the values are set and neither do any classes that inherit from this class.
Option 2 and 3 provides much better flexibility. You can:
1. Add additional logic to control values you can set for the variable.
2. Allow the derived class to change the logic.
3. Make the variable read only from the outside by not declaring the subroutine for setting the value or the property for setting the value (while still allow the value to be changed during initializing, or by other subroutines or functions within the class).
The following is a sample of the above:
'
' Module and Classes Sample
' User: Strovek
' Date: 8/28/2005
'
' ========================================

Imports System

Namespace PJ

Module Mod1
 Dim vNumVar1 As Integer = 10

 Public Property pIntVal As Integer
  Get
   Return vNumVar1
  End Get
  Set (Value As Integer)
   vNumVar1 = Value
  End Set
 End Property
End Module

Module Mod2
 Sub Main
  Console.WriteLine("test program")
  pIntVal = 5
  Console.WriteLine("Mod1 integer value is {0}.", pIntVal)

  Dim ObjC1 As New cls1
  Dim ObjC2 As New cls1

  Console.WriteLine("Obj 1 integer value is {0}.", ObjC1.pIntVal2)
  Console.WriteLine("Obj 2 integer value is {0}.", ObjC2.pIntVal2)
  ObjC1.pIntVal2 = 9
  ObjC2.pIntVal2 = 20
  Console.WriteLine("Obj 1 integer2 value is {0}.", ObjC1.pIntVal2)
  Console.WriteLine("Obj 2 integer2 value is {0}.", ObjC2.pIntVal2)

  Console.WriteLine("Obj 1 integer3 value is {0}.", ObjC1.pIntVal3)
  Console.WriteLine("Obj 2 integer3 value is {0}.", ObjC2.pIntVal3)


 End Sub
End Module

Public Class cls1
 Dim vNumVar1 As Integer = 10

 Public Sub New()
 End Sub

 Public Property pIntVal2 As Integer
  Get
   Return vNumVar1
  End Get
  Set (Value As Integer)
   vNumVar1 = Value
  End Set
 End Property

 Public Function pIntVal3 As Integer
  return pIntVal
 End Function

End Class
End Namespace
The output is as follows:
In Sub Var3 and Property Var4, if the value passed is more than 50, set the value to –1.
Constants
Constants can (declared at the top of the program and) be used to provide a fixed value that can be used in various parts of the program. This will ease maintenance by allowing single point of modification when the value changes. It can also be used to make the code more readable by replacing numeric code with a readable name for example example vbNewLine to represent a CrLf, ConnectionState.Open is easier to understand than the numeric code it represents.
Classes Inheritance and Overriding
VB.Net is an Object Oriented Programming Language. As such, it supports inheritance.
A subroutine or function can be overwritten only if it has the keyword Overridable – the new class can then declare the new subroutine and function (with the same name) using the keyword Overrides.
Constants must be declared as Friends before it can be visible to the derived class. If the derived class wishes to overrides the value of the constant, then the new constant needs to be declared as Shadows.
The following is an example:
' Inheritance Sample
' User: Strovek
' Date: 8/28/2005
'
' ========================================

Imports System

Namespace PJ

Public Class clsOr
 Friend Const preFixStr As String = "Sub Routine"

 Public Overridable Function dispSub1 As String
  return preFixStr & " 1"
 End function

 Public Overridable Function constVal As String
  Return preFixStr
 End Function

 Public Sub New()
 End Sub
End Class

Public Class clsNew
 Inherits PJ.clsOr

 Public Overrides Function dispSub1 As String
  Return preFixStr & " 1 - Changed"
 End Function

End Class

Public Class cls2ndGen
 Inherits clsNew

 Shadows Const preFixStr As String = "Another Value"

 Public Overrides Function dispSub1 As String
  Return "Unrelated value"
 End Function

End Class

Public Class cls3rdGen
 Inherits cls2ndGen

 Shadows Const preFixStr As String = "New Value"

 Public Overrides Function dispSub1 As String
  Return "Unrelated value 2"
 End Function

 Public Overrides Function constVal As String
  Return preFixStr
 End Function

End Class

Module Mod1
 Public Sub Main
  Console.WriteLine("Program Start")
  Dim Obj1 As New clsOr
  Dim Obj2 As New clsNew
  Dim Obj3 As New cls2ndGen
  Dim Obj4 As New cls3rdGen

  Console.WriteLine("Obj 1 constVal is {0}", obj1.constVal)
  Console.WriteLine("Obj 2 constVal is {0}", obj2.constVal)
  Console.WriteLine("Obj 3 constVal is {0}", obj3.constVal)
  Console.WriteLine("Obj 4 constVal is {0}", obj4.constVal)


  Console.WriteLine("Obj 1 sub 1 is {0}", obj1.dispSub1)
  Console.WriteLine("Obj 2 sub 1 is {0}", obj2.dispSub1)
  Console.WriteLine("Obj 3 sub 1 is {0}", obj3.dispSub1)
  Console.WriteLine("Obj 4 sub 1 is {0}", obj4.dispSub1)

 End Sub

End Module

End Namespace
In cls2ndGen class, even though the value of constVal was changed to “preFixStr”, the constVal still displays the original value. This is because we are using the constVal inherited from clsOr (the original class). When writing Windows Form, Web Services and ASP.Net applications; inheriting the appropriate classes will make programming much easier.
Inheriting a class provides the option to override existing methods (subroutine or functions) or using the original implementation. That is the true power of inheritance – allowing building on the existing code (instead of starting from scratch).
Main Subroutine
When writing a console program, one shared subroutine called main is necessary. Adding the (args() as String) parameter will allow the program to accept runtime parameters.
'
' Program with Parameters
' User: Strovek
' Date: 8/30/2005
'
' ========================================
Imports System
Module PrgWithParam
Sub Main(args() As String)
Console.Writeline("Start Program")
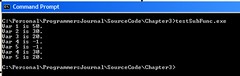
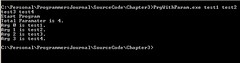
Console.WriteLine("Total Paramater is {0}.", args.Length)
Dim loopCnt As Integer
For loopCnt = 0 To args.Length-1
Console.WriteLine("Arg {0} is {1}.", loopCnt, args(loopCnt))
Next
End Sub
End Module
The output is as follows:
When writing a Windows Form, a main subroutine is optional. However, a Windows Form application must:
1. Inherit from a System.Windows.Forms (or another derived class). So you cannot use a module to create program.
2. Import System.Drawing (since we will be using a lot of graphics – which we did not need when we wrote a text based (console) application.
3. Perform a System.Windows.Forms.Application.Run the form object.
The following sample will create a blank window:
'
' Simple Windows Form
' User: Strovek
' Date: 8/30/2005
'
' ========================================

Imports System
Imports System.Drawing
Imports System.Windows.Forms

Namespace PJ

Public Class wForm
 Inherits Form

 Public Shared Sub Main()
  Dim winObj As New wForm
  application.Run(winObj)
 End Sub
End Class
End Namespace
The output is as follows:
For the windows form, the shared main subroutine is optional. If you leave out the shared main subroutine is not available, the main class must be specified using /main:
The modified code is as follows (the output is identical with the code above) – I added the namespace to illustrate that the class needs to be a fully qualified class, if no namespace is there then you specify /main:wForm.
'
' Simple Windows Form
' User: Strovek
' Date: 8/30/2005
'
' ========================================

Imports System
Imports System.Drawing
Imports System.Windows.Forms

Namespace PJ

Public Class wForm
 Inherits Form

End Class
End Namespace
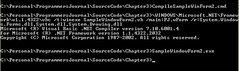
The compile the above program, we need to type the following (all in one line):
\WINDOWS\Microsoft.NET\Framework\v1.1.4322\vbc /t:winexe SampleWindowForm2.vb /main:PJ.wForm /r:System.Windows.Forms.dll,System.dll,System.Drawing.dll
The following is how the process looks like:
Events
In Window Form and ASP.Net application, majority of the work is done through event handling. Most of the controls have built in events (e.g. Buttons have Click, Form contains load etc).
There are two ways of handling events:
1. Create a subroutine and specify that it “handles the event”.
2. Adding the handler to the event
In the samples below, you will notice that all subroutines handling the events have to be declared with an object and also an eventargs as parameters. This is because the event will pass both these parameters to the event handler subroutine.
Note that you can have more than one subroutine handle a specific event and a subroutine handle multiple events.
Direct event handling
In this approach, just add the keyword “WithEvents” to the object declaration as in:
WithEvents Private btnSubmit2 As System.Windows.Forms.Button
Then declare the subroutine as handling the event as follows:
Private Sub BtnSubmitClick(sender As System.Object, _
e As System.EventArgs) handles btnSubmit.Click
MsgBox("Button Clicked")
End Sub
Adding the handler to the event
In this approach, the “WithEvents” keyword is optional in the object declaration:
Private btnSubmit2 As System.Windows.Forms.Button
Add the handler to the event using AddressOf creates a procedure delegate instance that references the specific procedure. It is a pointer associated to the procedure:
AddHandler Me.btnSubmit2.Click, AddressOf Me.BtnSubmit2Click
Once done, it is not necessary to specify the event in the subroutine declaration, as shown below:
Private Sub BtnSubmit2Click(sender As System.Object, e As System.EventArgs)
The following code illustrates the above concept. There are three buttons – two buttons are declared with “WithEvents” keyword. btnSubmit and btnSubmit3 have two handlers. Subroutine MultiHandler handles two events. The sender can be converted to the original control using CType Function, (otherwise gettype will return the type). In this case, we know that the sender is a button control, so it can be converted back to its original control in order to obtain the name of the sender.
'
' Sample Windows Form Events
' User: Strovek
' Date: 8/26/2005
'
' ========================================
Imports System
Imports System.Drawing
Imports System.Windows.Forms
Imports Microsoft.VisualBasic

Namespace TestWinform

Public Class MainForm
 Inherits System.Windows.Forms.Form
 WithEvents Private btnSubmit As System.Windows.Forms.Button
 WithEvents Private btnSubmit3 As System.Windows.Forms.Button
 Private btnSubmit2 As System.Windows.Forms.Button

 Public Shared Sub Main
  Dim fMainForm As New MainForm
  fMainForm.ShowDialog()
 End Sub

 Public Sub New()
  MyBase.New
  '
  ' The Me.InitializeComponent call is required for
' Windows Forms designer support.
  '
  Me.InitializeComponent
  '
  ' TODO : Add constructor code after InitializeComponents
  '
 End Sub

 #Region " Windows Forms Designer generated code "
 ' This method is required for Windows Forms designer support.
 ' Do not change the method contents inside the source code
' editor. The Forms designer might
 ' not be able to load this method if it was changed manually.
 Private Sub InitializeComponent()
  Me.btnSubmit2 = New System.Windows.Forms.Button
  Me.btnSubmit3 = New System.Windows.Forms.Button
  Me.btnSubmit = New System.Windows.Forms.Button
  Me.SuspendLayout
  '
  'btnSubmit2
  '
  Me.btnSubmit2.Location = New System.Drawing.Point(104, 88)
  Me.btnSubmit2.Name = "btnSubmit2"
  Me.btnSubmit2.TabIndex = 1
  Me.btnSubmit2.Text = "Submit2"
  AddHandler Me.btnSubmit2.Click, _
AddressOf Me.BtnSubmit2Click
  '
  'btnSubmit3
  '
  Me.btnSubmit3.Location = New _
System.Drawing.Point(104, 200)
  Me.btnSubmit3.Name = "btnSubmit3"
  Me.btnSubmit3.TabIndex = 2
  Me.btnSubmit3.Text = "Submit3"
  AddHandler Me.btnSubmit3.Click, _
AddressOf Me.BtnSubmit3Click
  '
  'btnSubmit
  '
  Me.btnSubmit.Location = New System.Drawing.Point(104, 144)
  Me.btnSubmit.Name = "btnSubmit"
  Me.btnSubmit.TabIndex = 0
  Me.btnSubmit.Text = "Submit"
  '
  'MainForm
  '
  Me.AutoScaleBaseSize = New System.Drawing.Size(5, 13)
  Me.ClientSize = New System.Drawing.Size(292, 266)
  Me.Controls.Add(Me.btnSubmit3)
  Me.Controls.Add(Me.btnSubmit2)
  Me.Controls.Add(Me.btnSubmit)
  Me.Name = "MainForm"
  Me.Text = "MainForm"
  Me.ResumeLayout(false)
 End Sub
 #End Region

 Private Sub BtnSubmitClick(sender As System.Object, _
e As System.EventArgs) handles btnSubmit.Click
  MsgBox("Button Clicked")
 End Sub

 Private Sub BtnSubmit2Click(sender As System.Object, _
e As System.EventArgs)
  msgbox("Button 2 Clicked")

 End Sub

 Private Sub BtnSubmit3Click(sender As System.Object, _
e As System.EventArgs)
  MsgBox("Button 3 Clicked")
 End Sub

 Private Sub MultiHandler(sender As System.Object, _
e As System.EventArgs) _
Handles btnSubmit.Click, btnSubmit3.Click
  MsgBox("Button 1 or 3 has been clicked")
  msgbox(sender.ToString & " sent this event:" & e.ToString)

  Dim tmpBtn as System.Windows.Forms.Button = _
Ctype(sender, System.Windows.Forms.Button)
  msgbox("the name is " & tmpbtn.Text)
 End Sub

End Class
End Namespace
Sunday, May 17, 2009
Programmer's Journal - Chapter 2
Chapter 2 – Where’s my data?
Database access in dotNet
Connection String
DotNet framework comes with four data providers. They are:
1. Data provider for SQLServer.
2. Data provider for OleDB.
3. Data provider for ODBC
4. Data provider for Oracle.
The syntax and methods provided for each of the providers are similar enough to each other in terms of usage and parameters that it can be used interchangeably.
The examples below are for connecting to an Oracle instance (using the account “Scott” and password “Tiger” and the oracle sqlnet alias “orcl”). For more examples on the connection strings, you can search for ado connection strings in Internet. (The DSN less odbc allows you to skip the step of defining the DSN in the ODBC).
Data provider Connection String
Oledb provider "Provider=MSDAORA;Data Source=orcl;User Id=Scott;Password=Tiger;"
Oracle provider "Data Source=orcl;User Id=Scott;Password=Tiger;"
DSNless ODBC "Driver={Microsoft ODBC for Oracle};Server=orcl.world;Uid=Scott;Pwd=Tiger;"
Use the correct connection class with the correct connection string to open connection to the database.
To test the above, you can create all the connection string into your configuration file as follows:
Note that all the values are in one line. The database connection can be tested using the following code:
The output will look like this:
The above example illustrates how to connect using the different data providers – the syntax for connecting are identical no matter which provider you select. The difference lies in the class and connection string used. All the connection are placed within try-catch-finally blocks (and testing the connection state and closing it where necessary) to ensure that the connection is closed. This approach will not work if exception is thrown within the exception section (since this will stop the execution and go to the next catch statement - possibly outsite the current function or procedure).
It is critical that all database connection be closed after use otherwise the connection will not be returned to the connection pool. (IIS automatically creates and manages database connection pooling). If the connections are not returned to the connection pool, IIS will have to keep creating new connections to add to the connection pool and in time, it will degrade the performance of the server.
Microsoft has replaced ResultSet (in ASP and previous version of Microsoft languages - VB6, VC++ 6) with DataReader and DataAdapter. The preparedstatement in ADO is replaced with Command. These are linked to the specific provider type (e.g. OleDBDataAdapter, OleDBDataReader, OleDBCommand).
Data Query Options
Microsoft also introduced some new supporting classes such as DataSet, DataTable, DataRow, DataColumns and DataView (for in memory database manipulation), which is independent of the data providers.
The following users the emp sample table provided by Oracle (when you create a new database). The sql statement used is:
Select * from emp;
DataReader
A sample:
The dataReader is a read only and forward only stream. It uses minimal memory because by default only one row is in memory at a time. Also, the data can be used as soon as it is available (for DataTable all the rows have to be loaded into memory before it is). The database connection has to be maintained for as long as access to the datareader object is needed (once closed the items and objects with the datareader is no longer available).
Most database connection allows only for one open datareader (only exception is OracleConnection). As such, it is important to close the datareader immediately after use.
DataAdapter
A DataAdapter is normally used to populate the data from the database into either a datatable or a dataset.
A Dataset can contain multiple datatables. A DataTable can contain Multiple DataRow and a DataRow can contain multiple DataColumns. You can think of a DataSet as a database consisting of one or many tables. As in a database, you can also create views – i.e. DataView. The connection to the database don’t need to remain open after the dataset or datatable is populated.
A sample:
The above example uses the DataCommand to query the database – the step is as follows:
1. Open the database connection.
2. Create a datacommand.
3. Assign an sql statement to the database command.
4. Assign the database command to an instantiated dataadapter (The database adapter can be instantiated during declaration as shown above).
5. Fill an instantiated Dataset. (when doing this, we need to provide the name for the table we are populating by providing a name – “empTab” in the above example).
After populating the datatable, the connection to the database may be closed and the datacommand disposed (to free up the memory used by the datacommand). The content of the data table is identical to the content obtained through a datareader.
DataView
DataView can be used to filter the records within the DataTable (similar to the way records are filtered using where clauses in sql select statements).
The dataview above example gets only records containing eName starting with “A”.
DataTable Select
Framework 2.0 introduced a select method in the datatable class. It can serve the same function as a DataView. As in the previous example, only name starting with A is selected. The select method will return an array of datarows:
Complete Program Listing
The complete program is as follows:
The output is as follows:
Program Start - Version 1.0.0
Data adapter test
Rec is SMITH
Rec is ALLEN
Rec is WARD
Rec is JONES
Rec is MARTIN
Rec is BLAKE
Rec is CLARK
Rec is SCOTT
Rec is KING
Rec is TURNER
Rec is ADAMS
Rec is JAMES
Rec is FORD
Rec is MILLER
Data adapter test
Number of tables 1
Number of rows 14
Rec is SMITH
Rec is ALLEN
Rec is WARD
Rec is JONES
Rec is MARTIN
Rec is BLAKE
Rec is CLARK
Rec is SCOTT
Rec is KING
Rec is TURNER
Rec is ADAMS
Rec is JAMES
Rec is FORD
Rec is MILLER
Number of columns are 8
Filtered rows 2
Rec ALLEN
Rec ADAMS
End Program
It is important to keep in mind that the DataAdapter may be using DataReader internally. This is important to keep in mind when writing a multi-threading application that could cause more than one DataAdapter to be executed at the same time (against the same database connection) which may affect you program (due to single open DataReader per database connection limitation).
This chapter has shown you how you can connect to the database and retrieve the data. This will serve as a foundation for the rest of the book.
Database access in dotNet
Connection String
DotNet framework comes with four data providers. They are:
1. Data provider for SQLServer.
2. Data provider for OleDB.
3. Data provider for ODBC
4. Data provider for Oracle.
The syntax and methods provided for each of the providers are similar enough to each other in terms of usage and parameters that it can be used interchangeably.
The examples below are for connecting to an Oracle instance (using the account “Scott” and password “Tiger” and the oracle sqlnet alias “orcl”). For more examples on the connection strings, you can search for ado connection strings in Internet. (The DSN less odbc allows you to skip the step of defining the DSN in the ODBC).
Data provider Connection String
Oledb provider "Provider=MSDAORA;Data Source=orcl;User Id=Scott;Password=Tiger;"
Oracle provider "Data Source=orcl;User Id=Scott;Password=Tiger;"
DSNless ODBC "Driver={Microsoft ODBC for Oracle};Server=orcl.world;Uid=Scott;Pwd=Tiger;"
Use the correct connection class with the correct connection string to open connection to the database.
To test the above, you can create all the connection string into your configuration file as follows:
<?xml version="1.0"?>
<configuration>
 <appSettings>
<add key="oleDBStr" value="Provider=MSDAORA;PASSWORD=tiger;User ID=scott;Data Source=orcl" />
<add key="odbcStr" value="Driver={Microsoft ODBC for Oracle};Server=orcl;Uid=Scott;Pwd=Tiger;" />
  <add key="orclStr" value="Data Source=orcl;User Id=Scott;Password=Tiger;" />
 </appSettings>
</configuration>
Note that all the values are in one line. The database connection can be tested using the following code:
' Connection Examples
' User: Strovek
' Date: 8/22/2005
' Revised:
'
'
Imports System
Imports System.Configuration.ConfigurationSettings
Imports System.Data
Imports System.Data.Odbc
Imports System.Data.OleDb
imports System.Data.OracleClient

Module clsConn
Dim oleConn As New System.Data.OleDb.OleDbConnection(AppSettings("oleDBStr"))
Dim odbcConn As New OdbcConnection(AppSettings("odbcStr"))
Dim orclConn as new System.Data.OracleClient.OracleConnection(AppSettings("orclStr"))

'Test oledb Connection
Sub oleTest
 Try
  Console.WriteLine("Start OLEDB Test")
  oleConn.Open
  Console.WriteLine("Connection Successful")
 Catch ex As Exception
  Console.WriteLine(ex.Message)
  Console.WriteLine(ex.StackTrace)
 Finally
  If oleConn.State = ConnectionState.Open Then
   oleConn.Close
  End If
 End Try
End Sub

'Test odbc Connection
Sub odbcTest
 Try
  Console.WriteLine("Start ODBC Test")
  odbcConn.Open
  Console.WriteLine("Connection Successful")
 Catch ex As Exception
  Console.WriteLine(ex.Message)
  Console.WriteLine(ex.StackTrace)
 Finally
  If odbcConn.State = ConnectionState.Open Then
   odbcConn.Close
  End If
 End Try
End Sub

'Test oracleClient Connection
Sub orclTest
 Try
  Console.WriteLine("Start Oracle Client Test")
  oleConn.Open
  Console.WriteLine("Connection Successful")
 Catch ex As Exception
  Console.WriteLine(ex.Message)
  Console.WriteLine(ex.StackTrace)
 Finally
  If orclConn.State = ConnectionState.Open Then
   orclConn.Close
  End If
 End Try
End Sub


Sub Main()
 Console.WriteLine("Program Start")
 'Dim CObj1 As New clsConn()
 oleTest
 odbcTest
 orclTest

End Sub
End Module
The output will look like this:
The above example illustrates how to connect using the different data providers – the syntax for connecting are identical no matter which provider you select. The difference lies in the class and connection string used. All the connection are placed within try-catch-finally blocks (and testing the connection state and closing it where necessary) to ensure that the connection is closed. This approach will not work if exception is thrown within the exception section (since this will stop the execution and go to the next catch statement - possibly outsite the current function or procedure).
It is critical that all database connection be closed after use otherwise the connection will not be returned to the connection pool. (IIS automatically creates and manages database connection pooling). If the connections are not returned to the connection pool, IIS will have to keep creating new connections to add to the connection pool and in time, it will degrade the performance of the server.
Microsoft has replaced ResultSet (in ASP and previous version of Microsoft languages - VB6, VC++ 6) with DataReader and DataAdapter. The preparedstatement in ADO is replaced with Command. These are linked to the specific provider type (e.g. OleDBDataAdapter, OleDBDataReader, OleDBCommand).
Data Query Options
Microsoft also introduced some new supporting classes such as DataSet, DataTable, DataRow, DataColumns and DataView (for in memory database manipulation), which is independent of the data providers.
The following users the emp sample table provided by Oracle (when you create a new database). The sql statement used is:
Select * from emp;
DataReader
A sample:
' Example of a database Reader
Public Sub doDBReader
 Console.WriteLine("Data adapter test")
 Dim dbCmd As OleDBCommand
 Dim dbReader As OleDBDataReader

 dbCmd = Conn.CreateCommand
 dbCmd.CommandText = sql
 dbReader = dbCmd.ExecuteReader

 While dbReader.Read
  Console.WriteLine("Rec is " & dbReader("ename"))
 End While
 dbReader.Close
 dbCmd.Dispose

End Sub
The dataReader is a read only and forward only stream. It uses minimal memory because by default only one row is in memory at a time. Also, the data can be used as soon as it is available (for DataTable all the rows have to be loaded into memory before it is). The database connection has to be maintained for as long as access to the datareader object is needed (once closed the items and objects with the datareader is no longer available).
Most database connection allows only for one open datareader (only exception is OracleConnection). As such, it is important to close the datareader immediately after use.
DataAdapter
A DataAdapter is normally used to populate the data from the database into either a datatable or a dataset.
A Dataset can contain multiple datatables. A DataTable can contain Multiple DataRow and a DataRow can contain multiple DataColumns. You can think of a DataSet as a database consisting of one or many tables. As in a database, you can also create views – i.e. DataView. The connection to the database don’t need to remain open after the dataset or datatable is populated.
A sample:
 Console.WriteLine("Data adapter test")
Dim dbCmd As OleDBCommand
Dim dbAdapt As New OleDBDataAdapter
Dim ds As New DataSet


dbCmd = Conn.CreateCommand
dbCmd.CommandText = sql
dbAdapt.SelectCommand = dbCmd
dbAdapt.Fill(ds, "empTab")
dbcmd.Dispose
CloseConn()
Console.WriteLine("Number of tables " & ds.Tables.Count)

Dim dbTab As DataTable = ds.Tables("empTab")
Console.WriteLine("Number of rows " & dbTab.Rows.Count)

Dim dRow As DataRow

For Each dRow In dbTab.Rows
 console.WriteLine("Rec is " & drow("ename"))
Next

Console.WriteLine("Number of columns are " & dbTab.Columns.Count)
The above example uses the DataCommand to query the database – the step is as follows:
1. Open the database connection.
2. Create a datacommand.
3. Assign an sql statement to the database command.
4. Assign the database command to an instantiated dataadapter (The database adapter can be instantiated during declaration as shown above).
5. Fill an instantiated Dataset. (when doing this, we need to provide the name for the table we are populating by providing a name – “empTab” in the above example).
After populating the datatable, the connection to the database may be closed and the datacommand disposed (to free up the memory used by the datacommand). The content of the data table is identical to the content obtained through a datareader.
DataView
DataView can be used to filter the records within the DataTable (similar to the way records are filtered using where clauses in sql select statements).
 Dim dView As DataView

dView = New DataView(dbTab, "eName Like 'A%'", "", DataViewRowState.CurrentRows)
Console.WriteLine("Filtered rows " & dView.Count)

Dim drView As DataRowView

For Each drView In dview
 console.WriteLine("Rec " & drview.Row("ename"))
Next
The dataview above example gets only records containing eName starting with “A”.
DataTable Select
Framework 2.0 introduced a select method in the datatable class. It can serve the same function as a DataView. As in the previous example, only name starting with A is selected. The select method will return an array of datarows:
 Dim dRowArray As DataRow()
 dRowArray = dbTab.Select("eName Like 'A%'")
 Console.WriteLine("Using Datatable select")
 Console.WriteLine("Filtered rows " & dRowArray.Length)

 For Each dRow In dRowArray
  Console.WriteLine("Rec " & dRow("ename"))
 Next
Complete Program Listing
The complete program is as follows:
' Chapter 2 - Data Query
'
' User: Strovek
' Revised
' Date: 8/23/2005
'
' ========================================

Imports Microsoft.VisualBasic
Imports System
Imports System.Data
Imports System.Data.OleDb
Imports System.Reflection


<Assembly: AssemblyTitle("DB Query")>
<Assembly: AssemblyDescription("")>
<Assembly: AssemblyCompany("Programmer's Journal")>
<Assembly: AssemblyProduct("")>
<Assembly: AssemblyCopyright("Programmer's Journal")>
<Assembly: AssemblyTrademark("")>
<Assembly: AssemblyVersion("1.0.0")>
<Assembly: AssemblyFileVersion("1.0.0")>

Namespace PJ

 Public Class clsDBQry

  Dim connStr as string = System.Configuration.ConfigurationSettings.AppSettings("connStr")
  Dim Conn As New OleDBConnection(System.Configuration.ConfigurationSettings.AppSettings("connStr"))
  Dim sql As String = "select * from emp"


  ' For opening the database connection
  Public Sub OpenConn()
   Conn.Open
  End Sub

  ' Will Close the database connection if it is open
  Public Sub CloseConn()
   If Conn.State = ConnectionState.Open Then
    Conn.Close
   End If
  End Sub


  ' Example of a database Reader
  Public Sub doDBReader
   Console.WriteLine("Data adapter test")
   Dim dbCmd As OleDBCommand
   Dim dbReader As OleDBDataReader

   dbCmd = Conn.CreateCommand
   dbCmd.CommandText = sql
   dbReader = dbCmd.ExecuteReader

   While dbReader.Read
    Console.WriteLine("Rec is " & dbReader("ename"))
   End While
   dbReader.Close
   dbCmd.Dispose

  End Sub

  ' Example of a DataBase Adapter/DataSet/DateTable/DataColumn/DataView
  Public Sub doDataSet

   Console.WriteLine("Data adapter test")
   Dim dbCmd As OleDBCommand
   Dim dbAdapt As New OleDBDataAdapter
   Dim ds As New DataSet


   dbCmd = Conn.CreateCommand
   dbCmd.CommandText = sql
   dbAdapt.SelectCommand = dbCmd
   dbAdapt.Fill(ds, "empTab")
   dbcmd.Dispose
   CloseConn()
   Console.WriteLine("Number of tables " & ds.Tables.Count)

   Dim dbTab As DataTable = ds.Tables("empTab")
   Console.WriteLine("Number of rows " & dbTab.Rows.Count)

   Dim dRow As DataRow

   For Each dRow In dbTab.Rows
    console.WriteLine("Rec is " & drow("ename"))
   Next

   Console.WriteLine("Number of columns are " & dbTab.Columns.Count)

   Dim dView As DataView

   dView = New DataView(dbTab, _
"eName Like 'A%'", "", DataViewRowState.CurrentRows)
   Console.WriteLine("Filtered rows " & dView.Count)

   Dim drView As DataRowView

   For Each drView In dview
    console.WriteLine("Rec " & drview.Row("ename"))
   Next


  End Sub

  ' Routine to return the version of this program
     Public Shared Function Ver() As String
          Return System.Diagnostics.FileVersionInfo.GetVersionInfo(System.Reflection.Assembly.GetExecutingAssembly.Location).ProductVersion
     End Function

  Public Shared Sub Main()
   Console.WriteLine("Program Start - Version " & Ver())

   Dim qryObj As New clsDBQry

   Try
    qryObj.OpenConn
    qryObj.doDBReader
    qryObj.doDataSet
   Catch ex As Exception
   Console.WriteLine("Error has occurred " & vbNewLine & ex.Message())
    Console.WriteLine(ex.StackTrace())
   Finally
    qryObj.CloseConn
   End Try
   Console.WriteLine("End Program")

  End Sub
 End Class
End Namespace
The output is as follows:
Program Start - Version 1.0.0
Data adapter test
Rec is SMITH
Rec is ALLEN
Rec is WARD
Rec is JONES
Rec is MARTIN
Rec is BLAKE
Rec is CLARK
Rec is SCOTT
Rec is KING
Rec is TURNER
Rec is ADAMS
Rec is JAMES
Rec is FORD
Rec is MILLER
Data adapter test
Number of tables 1
Number of rows 14
Rec is SMITH
Rec is ALLEN
Rec is WARD
Rec is JONES
Rec is MARTIN
Rec is BLAKE
Rec is CLARK
Rec is SCOTT
Rec is KING
Rec is TURNER
Rec is ADAMS
Rec is JAMES
Rec is FORD
Rec is MILLER
Number of columns are 8
Filtered rows 2
Rec ALLEN
Rec ADAMS
End Program
It is important to keep in mind that the DataAdapter may be using DataReader internally. This is important to keep in mind when writing a multi-threading application that could cause more than one DataAdapter to be executed at the same time (against the same database connection) which may affect you program (due to single open DataReader per database connection limitation).
This chapter has shown you how you can connect to the database and retrieve the data. This will serve as a foundation for the rest of the book.
Tuesday, May 5, 2009
Programmer's Journal - Chapter 1
Before starting this blog, I wrote a quick guide on getting started on .Net. Since it took me several months to prepare the book, I thought I will share it here.
This is chapter 1.
Chapter 1 - Getting Started
Writing your first dotNet program.
Before you can start writing a dotNet program, you need to install the framework. This can be obtained from the Microsoft website. All Framework related download and information are available at http://msdn.microsoft.com/netframework/programming/.
There are currently three versions of the .Net framework – Version 1.0 (which is not used anymore), Version 1.1 (it is recommended that you install service pack 1 if you are using this version) and Version 2.0 (which has just been released).
The framework will be installed in the windows directory. Assuming your windows directory is c:\windows and you are installing framework 1.1, the framework will be installed into C:\WINDOWS\Microsoft.NET\Framework\v1.1.4322. Two compilers are included with the framework, vbc.exe (for Visual Basic) and csc.exe for (C#). Framework 2.0 will be installed in C:\WINDOWS\Microsoft.NET\Framework\v2.0.50727.
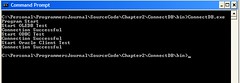
With this you should be able to write your first Visual Basic.Net program. As you can see in the screen below, you can even write programs just using the dos prompt.

So what is next? In order to write program in any language, we need to know what is available. Microsoft has graciously provided such information. It is all packaged in the dotNet SDK. It comes with the documentation, tools and tutorials to get started.
Visual Studio.Net 2003 comes with its own set documentation containing all the documentation provided in the SDK but adds information that are applicable in Visual Studio.
Note that the documentation in SDK for Framework 2.0 is not as complete as the documentation in SDK for Framework 1.1. The documentation in Framework 2.0 only provide code samples, while the documentation in Framework 1.1 provides samples and also notes of the different classes, properties and methods.
Versioning
Start the Windows explorer and go to the HelloWorld.exe we generated earlier and select the properties, either by using the right button and select properties or highlighting the file and press Alt-Enter. You will then see the following window:
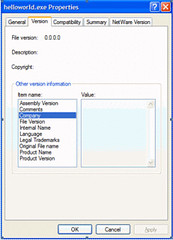
In the version tab, all the values are blank and the version numbers are all 0.0.0.0.
That is because the versioning information was not provided in the sourcecode when the program was compiled. The version information can be added into the program by adding the following code:
Imports System.Reflection
<Assembly: AssemblyTitle("Hello World")>
<Assembly: AssemblyDescription("")>
<Assembly: AssemblyCompany("Programmer's Journal")>
<Assembly: AssemblyProduct("")>
<Assembly: AssemblyCopyright("Programmer's Journal")>
<Assembly: AssemblyTrademark("")>
<Assembly: AssemblyVersion("1.0.0")>
<Assembly: AssemblyFileVersion("1.0.0")>
This can be done either directly in the program file or in a separate vb file and compile it together with your program file. Visual Studio 2003 uses the separate file approach and generates a file called AssemblyInfo.vb. The AssemblyVersion is set 1.0.* and is incremented automatically each time the project is compiled. This information has been moved to project file in Visual Studio 2005 – (for vb programs, that will be the .vbproj file).
Assuming we stored the above program as AssemblyInfo.vb, we need to compile the program using the following command:
C:\WINDOWS\Microsoft.NET\Framework\v1.1.4322\vbc helloworld.vb assemblyinfo.vb /out:helloworld.exe
If you want to compile using Framework 2.0, the the command will be:
C:\WINDOWS\Microsoft.NET\Framework\v2.0.50727\vbc helloworld.vb assemblyinfo.vb /out:helloworld.exe
Windows will know which version of the framework to use when the program is invoked when more than one framework is installed in the machine. This allows multiple version of Framework to coexist on one machine.
After compiling, look at the properties of the exe again – the version information has been added to the file properties:

Multiple files can be compiled into one .exe or .dll file – by specifying list of files in the command line (separated by space) when invoking the compiler. In dotNet, all programs and libraries are referred to as assemblies.
In a production environment, version information is important when taking calls from users. The problem the encountered may have been fixed, it is important to make it simple for the user to know the version number of the program they are running. The version information can be obtained using the following method: System.Diagnostics.FileVersionInfo.GetVersionInfo against itself. The function that you can use for the assembly to refer to itself is System.Reflection.Assembly.GetExecutingAssembly.Location.
There are two types of version: AssemblyVersion and AssemblyFileVersion. The AssemblyFileVersion is the version number you will see when you look at the properties of the file. The AssemblyVersion is used by the Version binding policy – can be used when there are multiple incompatible versions of assembly. The binding policy is only available for strong name assemblies.
The following program contains different ways of getting the assembly version number:
Imports System.Reflection
<Assembly: AssemblyTitle("Hello World")>
<Assembly: AssemblyDescription("")>
<Assembly: AssemblyCompany("Programmer's Journal")>
<Assembly: AssemblyProduct("")>
<Assembly: AssemblyCopyright("Programmer's Journal")>
<Assembly: AssemblyTrademark("")>
<Assembly: AssemblyVersion("1.2.3")>
<Assembly: AssemblyFileVersion("2.4.6")>
After compiling, look at the file property and it will look like this:

The following is the output of the above program.

Assembly File Version is obtained by the various functions except for the last one, which returns the Assembly version. Assembly Version is important when we use strong named assembly since it can be used to control compatibility. Only strong named assembly can be placed into the Global Assembly Cache.
Assemblies in the Global Assembly Cache can be referred to from anywhere in the machine. For non-global assemblies, the Framework expects them in the same directory as the executing program (for Console and WinForm) or in the specially designated subdirectory (bin) in the virtual application in IIS.
Tools
Even though coding with the Framework can be done using simple text editors and the command prompt, it is very tedious (especially with the amount of typing needed to compile the program using the vbc command line). There are a few ways reduce the amount of typing, one is to use a batch files. However, there are tools that can help with the process.
The most obvious and comprehensive tool is Visual Studio.Net.
However, there are a lot of other options (most of them free) available.
Web Matrix
For designing and laying out ASP.net program, you can you Web Matrix. Since this tool was released by Microsoft to promote the use of Framework 1.1, it does not contain the newer controls that are introduced in Framework 2.0. This can be obtained from:
http://www.asp.net/webmatrix
It is unlikely that this tool will be updated to support Framework 2.0 since Microsoft will introduce Visual WebDeveloper 2005 Express Edition for that – which can be obtained for free during the first year of its introduction.
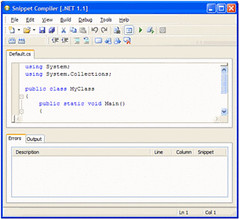
Snippet Compiler
This is a useful tool to perform compilation of C# and VB program – supports compiling codebehind file and will perform verification against the aspx file. It contains a limited IntelliSense – capable of only showing options for original classes, not for variables or derived objects. It has the capability of importing Visual Studio Projects.
You can also add references to your new library (DLL). The file will be locked if it is referenced, so you will need to remove the reference and shutdown the snippet compiler and restart if you want to compile the library.
Nevertheless, it is still a good utility for formatting and compilation. It provides an option to import a Visual Studio project, which is good if you have access to the source code but do not have Visual Studio handy. Unfortunately, at the time of writing does not recognize some of the newer classes in Framework 2.0 (there is a separate version for 1.1 and 2.0 but the version 2.0 still does not recognize some of the newer classes – probably because it was written while 2.0 was still in Beta).
The tool is available from http://www.sliver.com. The following is the snapshot of the tool:
SharpDeveloper
This is a free dotNet IDE that started with support for C# only but it has since extended its support into Visual Basic. It comes with a lot of features you can see in Visual Studio. It can be used for designing WinForm program, Console programs and console programs. It does not provide a design interface for ASP.Net.
It has a better-developed IntelliSense compared to Snippet Compiler. However, in order to write programs that refer more assemblies than the basic assembly, a project will need to be created (just as you do in Visual Studio).
Since it is a full fledge IDE, you will need to create a combined project – similar to project in Visual Studio to take add reference and control the Framework version you want to use. At the time of writing, there is no ASP.Net designer – it is asking for volunteers to work on that module. It also lacks the option to import project from Visual Studio.
The screen shot of the interface is shown below:
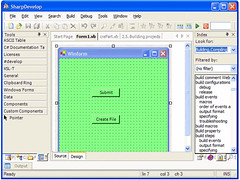
This tool is available from http://www.icsharpcode.net.
NANT
Nant brings the same functionality of ANT to dotNet (It is a powerful tool for performing compilations). It uses an XML to provide the necessary instruction to perform compilation. The following is a sample project for one of my projects:
This tool is available from:
http://nant.sourceforge.net/
By default, it will use the framework version the program is compiled in (version 1.1). If you want to use a different version, use the switch –t:net-2.0. This is controlled in the configuration file nant.exe.config in the bin directory of the nant folder. You may need to verify the copy you have since the Framework 2.0 build number was changed between Beta 1, 2 and RTM. (Changing from v2.0.40607 in Beta 1 to v2.0.50727 for the RTM) and update the version accordingly.
Microsoft introduced a new build utility – msbuild with Framework 2.0 that provides similar capabilities as NANT.
Visual Studio.Net 2005 Express
Visual Studio.Net 2005 express edition was launched on November 07, 2005. It comes in five different modules introduced:
1. Web Developer
2. Visual Basic
3. Visual C#
4. Visual C++
5. J#
For the first year (Nov 2005 to Nov 2006), it can be downloaded and used for free. After the first year the free download will no longer be available – will need to purchase but at a very low price. This express edition packages support only Framework 2.0.
Oracle SQL Developer
Oracle SQL Developer is a free tool that was introduced by Oracle to access their database, write stored procedures/function/packages. It can be downloaded from http://www.oracle.com/technology/software/index.html. This tool supports Oracle 9i and above. It may work with earlier versions of Oracle but you will not have all the functionalities.
It comes in a zip file; just unzip it to a directory and use. When you unzip to a directory (say c:\sqldeveloper, you will find two files sqldeveloper and sqldeveloper.exe, If using Windows then use sqldeveloper.exe (you should probably create a shortcut to this and put it in your desktop or start menu to make it easier for yourself). The other one (sqldeveloper), is used to start the sql developer in Unix.
When launched the program looks like this:
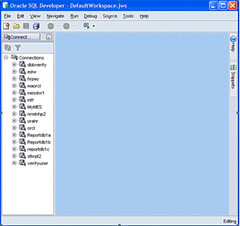
I created all the above connections. When you first start there will be no connections. To add Connections; right click on the Connections and then select New Database Connection… You will see the following:

You can then specify the database (by specifying all the information or use the information from your Oracle Client (if it is already installed on your computer), change the name, add the account and password.
After connecting, you will be able to browse the various objects within the instance as shown below:

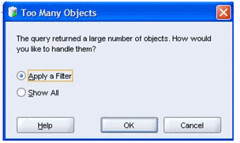
When viewing each of the categories, if the number of object exceeds a certain limit, you will encounter the following icon:

Double click it and you will get the following:
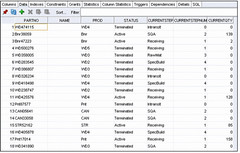
As you browse through the tables, you will be able to change the values directly. You can also filter the data you are shown etc.
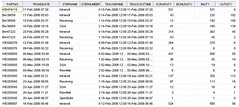
You can also open the SQL Worksheet and type in your sql statements to execute (F9 or ). If you have a date field within your table, you need to execute the following to specify the format you want, this has to be done each time you connect back into the database:
alter session set nls_date_format = 'dd-Mon-yyyy HH:mi'
Before executing the above command:

After:
When running your scripts, you can also click the . However, this will only work if the Explain table is available (it will be created for you if you have the right privileges. This is very useful, if you need to tune your scripts.
You can also edit your packages, stored procedure/functions directly.
There is too much features in this tool to cover here but I wanted to introduce you with some of the functions. You will need to experiment with the rest yourself.
Where is my INI?
In previous version of Visual Studio languages, ini was used to store many of the application configurations. In ASP, global.asa is used for this purpose.
With dotNet, Microsoft has standardized the configuration files to Xml format. For asp.net, you would use web.config in the virtual application directory and for executables (winform, Window service and console programs), the configuration file will reside in the same directory and the configuration file will match the program name followed by .config at the end – for example Hello.exe will have Hello.exe.config.
The following is an illustration how we can use the configuration file for a console program:
The configuration files looks like this:
<?xml version="1.0" encoding="UTF-8" ?>
<configuration>
<appSettings>
<add key="KeyString" value="Value in KeyString" />
</appSettings>
</configuration>
To access the above value, you need to use (if you are using Framework version 1.1) System.Configuration.ConfigurationSettings.AppSettings(“KeyString”)
If you are using Framework version 2.0, you should use the following instead:
For console/winform application:
System.Configuration.ConfigurationManager.AppSettings(“KeyString“)
For ASP.Net applications:
System.Web.Configuration.WebConfigurationManager.AppSettings(“KeyString“)
Let us proceed to modify the code; the modified code is as follows:
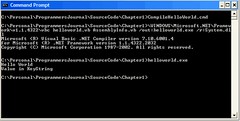
If you try to compile the above code using our previous approach, you will encounter an error
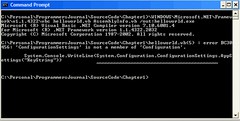
This is because the code required for reading the configuration file resides in the assembly called system.dll in the runtime directory (there are 86 base assemblies provided when you install the framework). We need to add /r:system.dll to let the compiler know to look up the code in that assembly. Once added, the compilation will produce the following result:
There is actually another kind of executable, which is an Internet Explorer hosted executable. The configuration is configured using the following tag:
<link rel=”ConfigurationFileName” href=”location”>
In addition to this configuration, there is also the machine.config and security.config file. Both of these files reside in the config directory below the where you install the framework (i.e. the runtime install location). For example the configuration file may reside in:
C:\WINDOWS\Microsoft.NET\Framework\v1.1.4322\CONFIG. These two files will control the configuration and security of the entire computer. It is recommended that changes be made through the .Net framework configuration tool (accessible via the administrative menu in Windows 2000) or using the Code Access security Policy tool (caspol.exe).
For most cases, it is not necessary to change the machine.config and security.config.
We will go into details on separate sections of the application configuration file later in the book.
This is chapter 1.
Chapter 1 - Getting Started
Writing your first dotNet program.
Before you can start writing a dotNet program, you need to install the framework. This can be obtained from the Microsoft website. All Framework related download and information are available at http://msdn.microsoft.com/netframework/programming/.
There are currently three versions of the .Net framework – Version 1.0 (which is not used anymore), Version 1.1 (it is recommended that you install service pack 1 if you are using this version) and Version 2.0 (which has just been released).
The framework will be installed in the windows directory. Assuming your windows directory is c:\windows and you are installing framework 1.1, the framework will be installed into C:\WINDOWS\Microsoft.NET\Framework\v1.1.4322. Two compilers are included with the framework, vbc.exe (for Visual Basic) and csc.exe for (C#). Framework 2.0 will be installed in C:\WINDOWS\Microsoft.NET\Framework\v2.0.50727.
With this you should be able to write your first Visual Basic.Net program. As you can see in the screen below, you can even write programs just using the dos prompt.
So what is next? In order to write program in any language, we need to know what is available. Microsoft has graciously provided such information. It is all packaged in the dotNet SDK. It comes with the documentation, tools and tutorials to get started.
Visual Studio.Net 2003 comes with its own set documentation containing all the documentation provided in the SDK but adds information that are applicable in Visual Studio.
Note that the documentation in SDK for Framework 2.0 is not as complete as the documentation in SDK for Framework 1.1. The documentation in Framework 2.0 only provide code samples, while the documentation in Framework 1.1 provides samples and also notes of the different classes, properties and methods.
Versioning
Start the Windows explorer and go to the HelloWorld.exe we generated earlier and select the properties, either by using the right button and select properties or highlighting the file and press Alt-Enter. You will then see the following window:
In the version tab, all the values are blank and the version numbers are all 0.0.0.0.
That is because the versioning information was not provided in the sourcecode when the program was compiled. The version information can be added into the program by adding the following code:
Imports System.Reflection
<Assembly: AssemblyTitle("Hello World")>
<Assembly: AssemblyDescription("")>
<Assembly: AssemblyCompany("Programmer's Journal")>
<Assembly: AssemblyProduct("")>
<Assembly: AssemblyCopyright("Programmer's Journal")>
<Assembly: AssemblyTrademark("")>
<Assembly: AssemblyVersion("1.0.0")>
<Assembly: AssemblyFileVersion("1.0.0")>
This can be done either directly in the program file or in a separate vb file and compile it together with your program file. Visual Studio 2003 uses the separate file approach and generates a file called AssemblyInfo.vb. The AssemblyVersion is set 1.0.* and is incremented automatically each time the project is compiled. This information has been moved to project file in Visual Studio 2005 – (for vb programs, that will be the .vbproj file).
Assuming we stored the above program as AssemblyInfo.vb, we need to compile the program using the following command:
C:\WINDOWS\Microsoft.NET\Framework\v1.1.4322\vbc helloworld.vb assemblyinfo.vb /out:helloworld.exe
If you want to compile using Framework 2.0, the the command will be:
C:\WINDOWS\Microsoft.NET\Framework\v2.0.50727\vbc helloworld.vb assemblyinfo.vb /out:helloworld.exe
Windows will know which version of the framework to use when the program is invoked when more than one framework is installed in the machine. This allows multiple version of Framework to coexist on one machine.
After compiling, look at the properties of the exe again – the version information has been added to the file properties:
Multiple files can be compiled into one .exe or .dll file – by specifying list of files in the command line (separated by space) when invoking the compiler. In dotNet, all programs and libraries are referred to as assemblies.
In a production environment, version information is important when taking calls from users. The problem the encountered may have been fixed, it is important to make it simple for the user to know the version number of the program they are running. The version information can be obtained using the following method: System.Diagnostics.FileVersionInfo.GetVersionInfo against itself. The function that you can use for the assembly to refer to itself is System.Reflection.Assembly.GetExecutingAssembly.Location.
There are two types of version: AssemblyVersion and AssemblyFileVersion. The AssemblyFileVersion is the version number you will see when you look at the properties of the file. The AssemblyVersion is used by the Version binding policy – can be used when there are multiple incompatible versions of assembly. The binding policy is only available for strong name assemblies.
The following program contains different ways of getting the assembly version number:
Imports System.Reflection
<Assembly: AssemblyTitle("Hello World")>
<Assembly: AssemblyDescription("")>
<Assembly: AssemblyCompany("Programmer's Journal")>
<Assembly: AssemblyProduct("")>
<Assembly: AssemblyCopyright("Programmer's Journal")>
<Assembly: AssemblyTrademark("")>
<Assembly: AssemblyVersion("1.2.3")>
<Assembly: AssemblyFileVersion("2.4.6")>
Module ShowVersion

Function Ver As String
 Dim fInfo As system.Diagnostics.FileVersionInfo
 fInfo = _
system.Diagnostics.FileVersionInfo.GetVersionInfo(system.Reflection.Assembly.GetExecutingAssembly.Location)
 Return _
finfo.FileMajorPart & "." & fInfo.FileMinorPart & "." & fInfo.FileBuildPart _
  & "." & fInfo.FilePrivatePart

End Function

Function Ver2() As String
    With _
  System.Diagnostics.FileVersionInfo.GetVersionInfo(System.Reflection.Assembly.GetExecutingAssembly.Location)
Return .FileMajorPart & "." & .FileMinorPart & "." & .FileBuildPart & "." & .FilePrivatePart
 End With
End Function

Function Ver3() As String
 With _
 System.Diagnostics.FileVersionInfo.GetVersionInfo(system.Reflection.Assembly.GetExecutingAssembly.Location)
Return  .ProductMajorPart & "." & .ProductMinorPart & "." _
& .ProductBuildPart & "." & .ProductPrivatePart
 End With
End Function

Function Ver4() As String
 Return _
  System.Diagnostics.FileVersionInfo.GetVersionInfo(system.Reflection.Assembly.GetExecutingAssembly.Location).ProductVersion
End Function

Function Ver5() As String
 Return _
 System.Diagnostics.FileVersionInfo.GetVersionInfo(system.Reflection.Assembly.GetExecutingAssembly.Location).FileVersion
End Function

Function Ver6() As String
    Return _
        System.Reflection.Assembly.GetExecutingAssembly.GetName.Version.ToString
End Function

Sub Main
 System.Console.WriteLine("Version - " & Ver())
 System.Console.WriteLine("Version 2 - " & Ver2())
 System.Console.WriteLine("Version 3 - " & Ver3())
 System.Console.WriteLine("Version 4 - " & Ver4())
 System.Console.WriteLine("Version 5 - " & Ver5())
    System.Console.WriteLine("Version 6 - " & Ver6())
End Sub
End Module
After compiling, look at the file property and it will look like this:
The following is the output of the above program.
Assembly File Version is obtained by the various functions except for the last one, which returns the Assembly version. Assembly Version is important when we use strong named assembly since it can be used to control compatibility. Only strong named assembly can be placed into the Global Assembly Cache.
Assemblies in the Global Assembly Cache can be referred to from anywhere in the machine. For non-global assemblies, the Framework expects them in the same directory as the executing program (for Console and WinForm) or in the specially designated subdirectory (bin) in the virtual application in IIS.
Tools
Even though coding with the Framework can be done using simple text editors and the command prompt, it is very tedious (especially with the amount of typing needed to compile the program using the vbc command line). There are a few ways reduce the amount of typing, one is to use a batch files. However, there are tools that can help with the process.
The most obvious and comprehensive tool is Visual Studio.Net.
However, there are a lot of other options (most of them free) available.
Web Matrix
For designing and laying out ASP.net program, you can you Web Matrix. Since this tool was released by Microsoft to promote the use of Framework 1.1, it does not contain the newer controls that are introduced in Framework 2.0. This can be obtained from:
http://www.asp.net/webmatrix
It is unlikely that this tool will be updated to support Framework 2.0 since Microsoft will introduce Visual WebDeveloper 2005 Express Edition for that – which can be obtained for free during the first year of its introduction.
Snippet Compiler
This is a useful tool to perform compilation of C# and VB program – supports compiling codebehind file and will perform verification against the aspx file. It contains a limited IntelliSense – capable of only showing options for original classes, not for variables or derived objects. It has the capability of importing Visual Studio Projects.
You can also add references to your new library (DLL). The file will be locked if it is referenced, so you will need to remove the reference and shutdown the snippet compiler and restart if you want to compile the library.
Nevertheless, it is still a good utility for formatting and compilation. It provides an option to import a Visual Studio project, which is good if you have access to the source code but do not have Visual Studio handy. Unfortunately, at the time of writing does not recognize some of the newer classes in Framework 2.0 (there is a separate version for 1.1 and 2.0 but the version 2.0 still does not recognize some of the newer classes – probably because it was written while 2.0 was still in Beta).
The tool is available from http://www.sliver.com. The following is the snapshot of the tool:
SharpDeveloper
This is a free dotNet IDE that started with support for C# only but it has since extended its support into Visual Basic. It comes with a lot of features you can see in Visual Studio. It can be used for designing WinForm program, Console programs and console programs. It does not provide a design interface for ASP.Net.
It has a better-developed IntelliSense compared to Snippet Compiler. However, in order to write programs that refer more assemblies than the basic assembly, a project will need to be created (just as you do in Visual Studio).
Since it is a full fledge IDE, you will need to create a combined project – similar to project in Visual Studio to take add reference and control the Framework version you want to use. At the time of writing, there is no ASP.Net designer – it is asking for volunteers to work on that module. It also lacks the option to import project from Visual Studio.
The screen shot of the interface is shown below:
This tool is available from http://www.icsharpcode.net.
NANT
Nant brings the same functionality of ANT to dotNet (It is a powerful tool for performing compilations). It uses an XML to provide the necessary instruction to perform compilation. The following is a sample project for one of my projects:
<?xml version="1.0"?>
<!--
NANT build File for Create Partition
Author Strovek
Date Apr 08, 2005
Revised

-->
<project name="crePartDate" default="build" basedir=".">
<property name="project.name" value="File Limit Alert"/>
<property name="project.version" value="1.1.0" />
<description>Create Oracle Partition.</description>
<property name="debug" value="true"  unless="${property::exists('debug')}" />
<property name="verbose" value="true" />
<target name="clean" description="remove all generated files">
 <delete file="crePartDate.exe" failonerror="false" />
 <delete file="crePartDate.pdb" failonerror="false" />
</target>
<target name="build" description="compiles the source code">
 <vbc target="exe" output="crePartDate.exe" debug="${debug}">
  <sources>
   <include name="crePartDate.vb" />
  </sources>
  <references>
   <include name="System.dll" />
   <include name="System.Web.dll" />
   <include name="System.XML.dll" />
   <include name="System.Data.dll" />
  </references>
 </vbc>
</target>
</project>
This tool is available from:
http://nant.sourceforge.net/
By default, it will use the framework version the program is compiled in (version 1.1). If you want to use a different version, use the switch –t:net-2.0. This is controlled in the configuration file nant.exe.config in the bin directory of the nant folder. You may need to verify the copy you have since the Framework 2.0 build number was changed between Beta 1, 2 and RTM. (Changing from v2.0.40607 in Beta 1 to v2.0.50727 for the RTM) and update the version accordingly.
Microsoft introduced a new build utility – msbuild with Framework 2.0 that provides similar capabilities as NANT.
Visual Studio.Net 2005 Express
Visual Studio.Net 2005 express edition was launched on November 07, 2005. It comes in five different modules introduced:
1. Web Developer
2. Visual Basic
3. Visual C#
4. Visual C++
5. J#
For the first year (Nov 2005 to Nov 2006), it can be downloaded and used for free. After the first year the free download will no longer be available – will need to purchase but at a very low price. This express edition packages support only Framework 2.0.
Oracle SQL Developer
Oracle SQL Developer is a free tool that was introduced by Oracle to access their database, write stored procedures/function/packages. It can be downloaded from http://www.oracle.com/technology/software/index.html. This tool supports Oracle 9i and above. It may work with earlier versions of Oracle but you will not have all the functionalities.
It comes in a zip file; just unzip it to a directory and use. When you unzip to a directory (say c:\sqldeveloper, you will find two files sqldeveloper and sqldeveloper.exe, If using Windows then use sqldeveloper.exe (you should probably create a shortcut to this and put it in your desktop or start menu to make it easier for yourself). The other one (sqldeveloper), is used to start the sql developer in Unix.
When launched the program looks like this:
I created all the above connections. When you first start there will be no connections. To add Connections; right click on the Connections and then select New Database Connection… You will see the following:
You can then specify the database (by specifying all the information or use the information from your Oracle Client (if it is already installed on your computer), change the name, add the account and password.
After connecting, you will be able to browse the various objects within the instance as shown below:
When viewing each of the categories, if the number of object exceeds a certain limit, you will encounter the following icon:
Double click it and you will get the following:
As you browse through the tables, you will be able to change the values directly. You can also filter the data you are shown etc.
You can also open the SQL Worksheet and type in your sql statements to execute (F9 or
). If you have a date field within your table, you need to execute the following to specify the format you want, this has to be done each time you connect back into the database:alter session set nls_date_format = 'dd-Mon-yyyy HH:mi'
Before executing the above command:
After:
When running your scripts, you can also click the
. However, this will only work if the Explain table is available (it will be created for you if you have the right privileges. This is very useful, if you need to tune your scripts.You can also edit your packages, stored procedure/functions directly.
There is too much features in this tool to cover here but I wanted to introduce you with some of the functions. You will need to experiment with the rest yourself.
Where is my INI?
In previous version of Visual Studio languages, ini was used to store many of the application configurations. In ASP, global.asa is used for this purpose.
With dotNet, Microsoft has standardized the configuration files to Xml format. For asp.net, you would use web.config in the virtual application directory and for executables (winform, Window service and console programs), the configuration file will reside in the same directory and the configuration file will match the program name followed by .config at the end – for example Hello.exe will have Hello.exe.config.
The following is an illustration how we can use the configuration file for a console program:
The configuration files looks like this:
<?xml version="1.0" encoding="UTF-8" ?>
<configuration>
<appSettings>
<add key="KeyString" value="Value in KeyString" />
</appSettings>
</configuration>
To access the above value, you need to use (if you are using Framework version 1.1) System.Configuration.ConfigurationSettings.AppSettings(“KeyString”)
If you are using Framework version 2.0, you should use the following instead:
For console/winform application:
System.Configuration.ConfigurationManager.AppSettings(“KeyString“)
For ASP.Net applications:
System.Web.Configuration.WebConfigurationManager.AppSettings(“KeyString“)
Let us proceed to modify the code; the modified code is as follows:
Module Hello
Sub Main
System.Console.writeline("Hello World")
System.Console.WriteLine( _
      System.Configuration.ConfigurationSettings.AppSettings("KeyString"))
End Sub
End Module
If you try to compile the above code using our previous approach, you will encounter an error
This is because the code required for reading the configuration file resides in the assembly called system.dll in the runtime directory (there are 86 base assemblies provided when you install the framework). We need to add /r:system.dll to let the compiler know to look up the code in that assembly. Once added, the compilation will produce the following result:
There is actually another kind of executable, which is an Internet Explorer hosted executable. The configuration is configured using the following tag:
<link rel=”ConfigurationFileName” href=”location”>
In addition to this configuration, there is also the machine.config and security.config file. Both of these files reside in the config directory below the where you install the framework (i.e. the runtime install location). For example the configuration file may reside in:
C:\WINDOWS\Microsoft.NET\Framework\v1.1.4322\CONFIG. These two files will control the configuration and security of the entire computer. It is recommended that changes be made through the .Net framework configuration tool (accessible via the administrative menu in Windows 2000) or using the Code Access security Policy tool (caspol.exe).
For most cases, it is not necessary to change the machine.config and security.config.
We will go into details on separate sections of the application configuration file later in the book.
Sunday, May 3, 2009
Polarhome
I found that there is a site which allows people to get access to different O/S for free. I think this is an excellent idea. I have not tried it but it looks genuine. Why don't you just try it? The url is as follows:
Saturday, May 2, 2009
Oracle Joins comparison
In version 9i, Oracle introduced a different way to join tables which are more consistent with other RDBMS databases.
The following statement will return the same results:
The following statement will return the same results:
 SELECT l.lotNum,
s.region       ,
l.currentstep
 FROM stepmaster s,
 lotmastertab l
WHERE s.region            > 'W'
AND l.currentstep (+) = s.step
AND l.lotNum  (+)      = 'ABC111';

SELECT lotNum,
s.region       ,
s.step,
currentstep
 FROM lla_stepeq s left outer join
 lotmastertab l  on step = currentstep
AND lotNum  = 'ABC111'
AND s.region > 'W';
Friday, May 1, 2009
Subscribe to:
Posts (Atom)