Chapter 10 - Protocols (SMTP, FTP, HTTP)The framework supports many kinds of Internet protocol. We have previously covered web services. Now let us look at a few more common protocols. SMTP for sending mail, FTP for file transfer and HTTP for obtaining information from other web pages.
SMTP (or Sending Mail)
SMTP stands for Simple Mail Transfer Protocol and is used to send mail. It uses port 25. When using this, you need to be aware that some antivirus software or firewalls will block this port and you may need to disable the blocking before you can send mail. This is because a lot of viruses also use this protocol to propagate themselves.
If you need to send a quick mail (which consist of text only), you can just use the simple function:
SMTP.Send(from, toMail, subject, body).
Framework 1.1 Example
The following is an example of sending attachment:
Imports Microsoft.VisualBasic
Imports System
Imports System.IO
Imports System.Web.Mail
Imports System.Reflection


' Program: TestMail_1.1
' Author: Strovek
' Date:  Mar 27, 2006
' Revised:
' Simple program for sending email - using codes for Framework 1.1
'
' ===================================================================

<Assembly: AssemblyVersionAttribute("1.0.0")>
<Assembly: AssemblyFileVersion("1.0.0")>
<Assembly: AssemblyCompanyAttribute("Programmer's Journal")>
<Assembly: AssemblyProductAttribute("FTP test")>

Module Module1

 Public Function prgVersion() As String
  Return _
 System.Diagnostics.FileVersionInfo.GetVersionInfo(_
System.Reflection.Assembly.GetExecutingAssembly.Location).FileVersion
 End Function

 Sub Main()
  Dim SMTPSrv As String
  Dim addr As String
       Console.WriteLine("Test Send Mail - Version " & prgVersion())

  Try
  SMTPSrv = System.Configuration.ConfigurationSettings.AppSettings("SMTPSrv")
   If Len(SMTPSrv) <= 0 Then
    Throw New Exception("No SMTP Server provided")
           End If
           Console.WriteLine("smtp server is " & SMTPSrv)

   addr = System.Configuration.ConfigurationSettings.AppSettings("Rcpt")
   If Len(addr) <= 0 Then
    Throw New Exception("No address provided")
   End If

  Dim Message As System.Web.Mail.MailMessage = New System.Web.Mail.MailMessage
   Message.To = addr
   Message.From = addr
           Message.Subject = "Test Mail - for testing SMTP"
           Message.Body = "Just a test  message"
           Message.Attachments.Add(New MailAttachment("c:\test2.txt"))
           SmtpMail.SmtpServer = SMTPSrv
   SmtpMail.Send(Message)
   Console.WriteLine("Message sent")

  Catch ex As Exception
   Console.WriteLine("Error " & ex.Message)
  End Try

  Console.WriteLine("End Program")
 End Sub

End Module
In the above example, the attachment is provided via the filename. This is the only option available in Framework 1.1.
The sample above uses the config file to provide the SMTP server name and also the receipients name. One of the services provided by IIS is SMTP; this is what we are using to send the mail. The config file is as follows:
<?xml version="1.0" encoding="utf-8" ?>
<configuration>
 <appSettings>
  <add key="SMTPSrv" value="localhost" />
  <add key="Rcpt" value="bteoh1@hotmail.com" />
 </appSettings>
</configuration>
Framework 2.0 Example
The new namespace System.Net.Mail is introduced in Framework 2.0 to replace System.Web.Mail namespace in Framework 1.1.
The following is a sample of the code using the new namespace.
Imports Microsoft.VisualBasic
Imports System
Imports System.IO
Imports System.Net.Mail
Imports System.Reflection


' Program: TestMail_2.0
' Author: Strovek
' Date:  Mar 27, 2006
' Revised:
' Simple program for sending email - using codes for Framework 1.1
'
' ===================================================================

<Assembly: AssemblyVersionAttribute("1.0.0")>
<Assembly: AssemblyFileVersion("1.0.0")>
<Assembly: AssemblyCompanyAttribute("Programmer's Journal")>
<Assembly: AssemblyProductAttribute("FTP test")>

Module Module1

 Public Function prgVersion() As String
  Return _
  System.Diagnostics.FileVersionInfo.GetVersionInfo(System.Reflection.Assembly.GetExecutingAssembly.Location).FileVersion
 End Function

 Sub Main()
  Dim SMTPSrv As String
        Dim addr As String
        Dim attch As Attachment
        Console.WriteLine("Test Send Mail - Version " & prgVersion())

  Try
            SMTPSrv = System.Configuration.ConfigurationManager.AppSettings("SMTPSrv")
   If Len(SMTPSrv) <= 0 Then
    Throw New Exception("No SMTP Server provided")
            End If
            Console.WriteLine("smtp server is " & SMTPSrv)

            addr = System.Configuration.ConfigurationManager.AppSettings("Rcpt")
   If Len(addr) <= 0 Then
    Throw New Exception("No address provided")
   End If

            Dim fromAddr As New MailAddress(addr)
            Dim toAddr As New MailAddress(addr)
            Dim Message As New System.Net.Mail.MailMessage(fromAddr, toAddr)

            Message.Subject = "Test Mail - for testing SMTP"
            Message.Body = "Just a test  message"
            Message.Attachments.Add(New Attachment("c:\test2.txt"))

            Dim strm As New MemoryStream
            Dim sw As New StreamWriter(strm)
            sw.WriteLine("Line 1")
            attch = New Attachment(strm, "test3.txt")
            Message.Attachments.Add(attch)

            Dim SMTP As New SmtpClient(SMTPSrv)
            SMTP.Send(Message)
            sw.Close()
            Console.WriteLine("Message sent")

  Catch ex As Exception
   Console.WriteLine("Error " & ex.Message)
  End Try

  Console.WriteLine("End Program")
 End Sub

End Module
Note the change in the constructor. This constructor is used because the .to method is read-only so has to be set in the constructor. The Attachment introduced in Framework 2.0 to replace mail-attachment allows passing a stream in the constructor. This is allows you to create an attachment in memory and send it (as shown in the example above).
The config file is identical to the one used in the previous example.
FTPFTP is short for File Transfer Protocol and is used primarily for transferring files to and from a remote ftp server. The support was provided in Framework 1.1. However, it was difficult because you have to implement your own code to handle the FTP protocol.
The ftp protocol code has been implemented in Framework 2.0. The following is a sample of transferring a file to and from the local ftp server:
' doFTP
' Author    Strovek
' Date      Apr 03, 2006
' Revised
' For performing simple FTP
' ===============================================================================


Imports Microsoft.VisualBasic
Imports System
Imports System.IO
Imports System.Text
Imports System.Net
Imports System.Reflection

<Assembly: AssemblyVersionAttribute("1.0.0")>
<Assembly: AssemblyFileVersion("1.0.0")>
<Assembly: AssemblyCompanyAttribute("Programmer's Journal")>
<Assembly: AssemblyProductAttribute("FTP test")>


Public Class doFTP

    Dim ftp As FtpWebRequest

    Public Shared Function prgVersion() As String
        Return _
        System.Diagnostics.FileVersionInfo.GetVersionInfo(_
System.Reflection.Assembly.GetExecutingAssembly.Location).FileVersion
    End Function

    Public Shared Sub main()
        Dim ftpSrv As String = Nothing
        Dim ftpUsr As String = Nothing
        Dim ftpPwd As String = Nothing
        Dim ftpDir As String = Nothing
        Dim fSrcName As String = "C:\icons\icons.bmp"
        Dim fTgtName As String = "icons.bmp"
        Dim fTgtName2 As String = "c:\tx\icons.bmp"

        Console.WriteLine("doFTP - Version " & prgVersion())

        Try

            ftpSrv = System.Configuration.ConfigurationManager.AppSettings("ftpSrv")
            ftpUsr = System.Configuration.ConfigurationManager.AppSettings("ftpUsr")
            ftpPwd = System.Configuration.ConfigurationManager.AppSettings("ftpPwd")
            ftpDir = System.Configuration.ConfigurationManager.AppSettings("ftpDir")

            If ftpSrv.Contains("ftp://") = False Then
                ftpSrv = "ftp://" & ftpSrv
            End If

            Dim ftpObj As New doFTP
            ftpObj.uploadFile(ftpSrv, ftpUsr, ftpPwd, "blank", fSrcName, fTgtName)
            ftpObj.downloadFile(ftpSrv, ftpUsr, ftpPwd, "blank", fTgtName, fTgtName2)

        Catch ex As Exception
            Console.WriteLine(ex.Message)
        End Try

        Console.WriteLine("End Program")

    End Sub

    ' for Uploading file
    Sub uploadFile(ByVal ftpSrv As String, ByVal usrName As String, _
        ByVal usrPwd As String, ByVal ftpDir As String, _
ByVal src As String, ByVal tgt As String)

        Dim ftpUrl As New StringBuilder

        If ftpSrv Is Nothing Then
            Throw New Exception("[upLoadFile01]ftp server not provided")
        End If
        If usrName Is Nothing Then
            Throw New Exception("[upLoadFile02]User Name not provided")
        End If
        If usrPwd Is Nothing Then
            Throw New Exception("[upLoadFile03]User Password not provided")
        End If
        If src Is Nothing Then
            Throw New Exception("[upLoadFile04]Source FileName not provided")
        End If
        If tgt Is Nothing Then
            Throw New Exception("[upLoadFile05]Target filename not provided")
        End If

        Dim ftpStream As Stream = Nothing
        Dim fStream As FileStream = Nothing
        Dim ftpResponse As FtpWebResponse = Nothing

        ftpUrl.Append(Trim(ftpSrv))
        If Trim(ftpSrv).EndsWith("/") = False Then
            ftpUrl.Append("/")
        End If
        ftpUrl.Append(Trim(ftpDir))
        If Trim(ftpDir).EndsWith("/") = False Then
            ftpUrl.Append("/")
        End If
        ftpUrl.Append(tgt)

        Try
            Console.WriteLine(ftpUrl.ToString)
            ftp = WebRequest.Create(ftpUrl.ToString)
            ftp.Credentials = New NetworkCredential(usrName, usrPwd)
            ftp.Method = WebRequestMethods.Ftp.UploadFile
            ftpStream = ftp.GetRequestStream

            fStream = File.Open(src, FileMode.Open)

            Dim buffer(1024) As Byte
            Dim bytesRead As Integer
            While True
                bytesRead = fStream.Read(buffer, 0, buffer.Length)
                If bytesRead = 0 Then
                    Exit While
                End If
                ftpStream.Write(buffer, 0, bytesRead)
            End While

            ' The request stream must be closed before getting the response.
            ftpStream.Close()
            fStream.Close()

            ftpResponse = ftp.GetResponse()
            Console.WriteLine(ftpResponse.StatusDescription)
            Console.WriteLine("Upload successful")
        Catch ex As Exception

            ' Need to check here since finally clause will
' never be reached because of the throw exception
            If fStream IsNot Nothing Then
                fStream.Close()
            End If
            If ftpStream IsNot Nothing Then
                ftpStream.Close()
            End If

            Console.WriteLine(ex.StackTrace)
            Throw New Exception("[upLoadFile06]" & ex.Message)
        Finally
            If fStream IsNot Nothing Then
                fStream.Close()
            End If
            If ftpStream IsNot Nothing Then
                ftpStream.Close()
            End If
        End Try

    End Sub

    Sub downloadFile(ByVal ftpSrv As String, ByVal usrName As String, _
        ByVal usrPwd As String, ByVal ftpDir As String, _
ByVal src As String, ByVal tgt As String)

        Dim ftpUrl As New StringBuilder

        If ftpSrv Is Nothing Then
            Throw New Exception("[downloadFile01]ftp server not provided")
        End If
        If usrName Is Nothing Then
            Throw New Exception("[downloadFile02]User Name not provided")
        End If
        If usrPwd Is Nothing Then
            Throw New Exception("[downloadFile03]User Password not provided")
        End If
        If src Is Nothing Then
            Throw New Exception("[downloadFile04]Source FileName not provided")
        End If
        If tgt Is Nothing Then
            Throw New Exception("[downloadFile05]Target filename not provided")
        End If

        Dim ftpStream As Stream = Nothing
        Dim fStream As FileStream = Nothing
        Dim ftpResponse As FtpWebResponse = Nothing

        ftpUrl.Append(Trim(ftpSrv))
        If Trim(ftpSrv).EndsWith("/") = False Then
            ftpUrl.Append("/")
        End If
        ftpUrl.Append(Trim(ftpDir))
        If Trim(ftpDir).EndsWith("/") = False Then
            ftpUrl.Append("/")
        End If
        ftpUrl.Append(src)

        Try
            Console.WriteLine(ftpUrl.ToString)
            ftp = WebRequest.Create(ftpUrl.ToString)
            ftp.Credentials = New NetworkCredential(usrName, usrPwd)
            ftp.Method = WebRequestMethods.Ftp.DownloadFile
            ftpResponse = ftp.GetResponse
            ftpStream = ftpResponse.GetResponseStream

            Dim buffer(1024) As Byte
            Dim bytesRead As Integer
            fStream = File.Create(tgt)
            While True
                bytesRead = ftpStream.Read(buffer, 0, buffer.Length)
                If bytesRead = 0 Then
                    Exit While
                End If
                fStream.Write(buffer, 0, bytesRead)
            End While

            ' The request stream must be closed before getting the response.
            ftpStream.Close()
            fStream.Close()

            Console.WriteLine("download successful")
        Catch ex As Exception

            ' Need to check here since finally clause will
'never be reached because of the throw exception
            If fStream IsNot Nothing Then
                fStream.Close()
            End If
            If ftpStream IsNot Nothing Then
                ftpStream.Close()
            End If

            Console.WriteLine(ex.StackTrace)
            Throw New Exception("[downloadFile06]" & ex.Message)
        Finally
            If fStream IsNot Nothing Then
                fStream.Close()
            End If
            If ftpStream IsNot Nothing Then
                ftpStream.Close()
            End If
        End Try

    End Sub

End Class
The following is the config file used with the sample above:
<?xml version="1.0"?>
<configuration>
 <appSettings>
   <add key="ftpSrv" value="ftp://localhost"/>
   <add key="ftpUsr" value="anonymous"/>
   <add key="ftpPwd" value="t@t.com"/>
   <add key="ftpDir" value="/blank/"/>
 </appSettings>
</configuration>
In the above sample, the uploadFile subroutine shows how to upload a file to the ftp server and downloadFile downloads the file from the ftp server. As shown in the example above, you need to provide the target server filename together with the directory and the server name. The same with when downloading the file, you need to provide the fully qualified path as in
ftp://localhost/blank/test.txt. The sample uses only ASCII transfer. In order to use binary file transfer, set the UseBinary property of the FtpWebRequest object to True. Note that all transfer used here are sent via clear text (without encryption). If your server supports SSL, you can set the EnableSSL property to true. In the case of SSL enabled, then the protocol used with ftps. There is another protocol called sftp - i.e. ftp over SSH (Secure Shell). The implementation is provided with the Framework (so you either have to provide your own implementation or obtain a third party implementation).
HTTP (also known as screen scrapping)
HTTP protocol is typically used either for screen scrapping, where you obtain information from other web pages or to automated submission of information to other web sites. However, many web developers have come out with mechanism to prevent programs from using their web sites with JavaScript, image - requiring the user to interprete and key in the values.
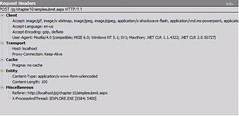
FiddlerBefore you can perform screen scrapping you need to know what needs to be transmitted to the web page. Microsoft provides a free tool (to be used with Internet Explorer) to do this - it is called Fiddler.
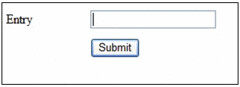
For the purpose of illustration, a simple page was created for the purpose of illustration:
Before submit:
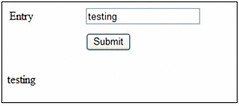
After Submit:
This is what you see in Fiddler:

Notice that what is sent to the server.
Code Sample
The following is a code sample of how we can use this information:
' ScrapScrn
' Author    Strovek
' Date      Apr 20, 2006
' Revised
' For performing simple FTP
' ===============================================================================

Imports Microsoft.VisualBasic
Imports System
Imports System.IO
Imports System.Net
Imports System.Text
'Imports System.Web

Module ScrapScrn
    Dim rqst As HttpWebRequest
    Dim rsp As HttpWebResponse
    Private header As WebHeaderCollection
    Private cookies As CookieContainer = New CookieContainer()
    Const url As String = "http://localhost/pj/chapter10/simplesubmit.aspx"

    Sub main(ByVal CmdArgs() As String)

        Console.WriteLine("Program start")
        Try
            postPage()
        Catch ex As Exception
            Console.WriteLine("Error " & vbNewLine & ex.Message)
        End Try
        Console.WriteLine("End Program")

    End Sub

    Sub postPage()

        Dim cookies As CookieContainer = New CookieContainer()
        rqst = WebRequest.Create(url)
        rsp = rqst.GetResponse
        Dim rspStr As String
        Dim sReader As New StreamReader(rsp.GetResponseStream)
        header = rqst.Headers ' Obtain the header values from the request
        cookies = rqst.CookieContainer ' Obtain Cookie from the request
        rspStr = sReader.ReadToEnd
        sReader.Close()
        Console.WriteLine("Response received" & vbNewLine & rspStr)

        Dim key As String

        Console.WriteLine("header content is as follows")
        For Each key In header.AllKeys
            Console.WriteLine("Key is {0} and value is {1}", key, header.Item(key))
        Next

        Dim viewState As String = ExtractViewState(rspStr)
        Console.WriteLine("viewState is " & viewState)

        Dim postData As String = String.Format("__VIEWSTATE={0}&txtEntry={1}&btnSubmit={2}", _
         viewState, "test", "Submit")
        Console.WriteLine("postData is " & postData)

        rqst = WebRequest.Create(url)
        'rqst.Headers = header  ' Repopulate the header values from the previous request
        rqst.CookieContainer = cookies ' Repopulate the cookies from the previous request
        rqst.ContentType = "application/x-www-form-urlencoded"
        rqst.Method = "POST"

        Dim sw As New StreamWriter(rqst.GetRequestStream)
        sw.Write(postData)
        sw.Close()

        rsp = rqst.GetResponse
        sReader = New StreamReader(rsp.GetResponseStream)
        rspStr = sReader.ReadToEnd
        sReader.Close()
        Console.WriteLine("Data after post" & vbNewLine & rspStr)

    End Sub

    Function ExtractViewState(ByVal strParam As String) As String
        Dim ViewStateDelimiter As String = "__VIEWSTATE"
        Dim valueDelimiter As String = "value="""

        Dim viewStateNamePosition As Integer = strParam.IndexOf(ViewStateDelimiter)
        Dim viewStateValuePosition As Integer = strParam.IndexOf( _
         valueDelimiter, viewStateNamePosition)

        Dim viewStateStartPosition As Integer = viewStateValuePosition + valueDelimiter.Length
        Dim viewStateEndPosition As Integer = strParam.IndexOf("""", viewStateStartPosition)

        Dim returnVal As String = _
         System.Web.HttpUtility.UrlEncodeUnicode(strParam.Substring(viewStateStartPosition, _
          viewStateEndPosition - viewStateStartPosition))

        Return returnVal
    End Function

End Module
The first portion of the code performs a get to the web page to obtain the headers, cookies etc. See below:
        Dim cookies As CookieContainer = New CookieContainer()
        rqst = WebRequest.Create(url)
        rsp = rqst.GetResponse
        Dim rspStr As String
        Dim sReader As New StreamReader(rsp.GetResponseStream)
        header = rqst.Headers ' Obtain the header values from the request
        cookies = rqst.CookieContainer ' Obtain Cookie from the request
        rspStr = sReader.ReadToEnd
        sReader.Close()
        Console.WriteLine("Response received" & vbNewLine & rspStr)
Since the web page was written in ASP.Net, it contains a hidden field called ViewState, we need to send back this value when we post the information. In order to that, we need to first get the value from the original response. The view state is as follows:
<input type="hidden" name="__VIEWSTATE" value="dDwxMzMzMTE3MDk3Ozs+ouZtBeP5/4BlYpWcfFxvgG8hQ8c=" />
To do that, first find the location of _VIEWSTATE and then find the location of the first value=" after that. Then get the value until the end of the quote. The function to do that is as follows:
Function ExtractViewState(ByVal strParam As String) As String
       Dim ViewStateDelimiter As String = "__VIEWSTATE"
       Dim valueDelimiter As String = "value="""

       Dim viewStateNamePosition As Integer = strParam.IndexOf(ViewStateDelimiter)
       Dim viewStateValuePosition As Integer = strParam.IndexOf( _
        valueDelimiter, viewStateNamePosition)

       Dim viewStateStartPosition As Integer = viewStateValuePosition + valueDelimiter.Length
       Dim viewStateEndPosition As Integer = strParam.IndexOf("""", viewStateStartPosition)

       Dim returnVal As String = _
        System.Web.HttpUtility.UrlEncodeUnicode(strParam.Substring(viewStateStartPosition, _
         viewStateEndPosition - viewStateStartPosition))

       Return returnVal
   End Function
Finally, construct the string you want to post, in this case is:
__VIEWSTATE=dDwxMzMzMTE3MDk3Ozs%2BouZtBeP5%2F4BlYpWcfFxvgG8hQ8c%3D&txtEntry=testing&btnSubmit=Submit
Another thing to note between the original get and the final post, the contenttype has changed.
The following is the original content type:

The following is the content-type when posting:
The following is the rest of the code:
        Dim postData As String = String.Format("__VIEWSTATE={0}&txtEntry={1}&btnSubmit={2}", _
         viewState, "test", "Submit")
        Console.WriteLine("postData is " & postData)

        rqst = WebRequest.Create(url)
        'rqst.Headers = header  ' Repopulate the header values from the previous request
        rqst.CookieContainer = cookies ' Repopulate the cookies from the previous request
        rqst.ContentType = "application/x-www-form-urlencoded"
        rqst.Method = "POST"

        Dim sw As New StreamWriter(rqst.GetRequestStream)
        sw.Write(postData)
        sw.Close()

        rsp = rqst.GetResponse
        sReader = New StreamReader(rsp.GetResponseStream)
        rspStr = sReader.ReadToEnd
        sReader.Close()
        Console.WriteLine("Data after post" & vbNewLine & rspStr)
In the above sample, we are sending back all the cookies that were obtained from the original request. The header was not returned because the contenttype is part of the header and should be changed.
As with FTP, we can also enableSSL to perform https.